

DIY solar panels and off-grid
DIY solar panel installation kits are popular with garden offices, garage roofs, and extension roof spaces. Both solar heating and electrical panel systems can be easy-to-install when working with a local tradesperson. Usualy delivery times are within three working days.
"I must say that I was highly impressed by a small delay in delivery, but you contacted me to advise and offered an alternative. The kit was good quality, and my plumber agreed."
Mr. Smith, Swansea.
PV solar panels kits
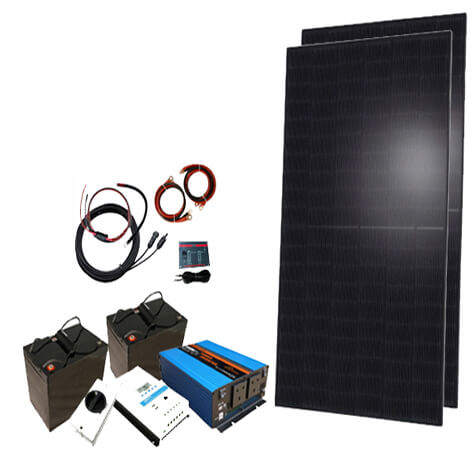
Off-grid or parallel photovoltaic solar panel systems save on primary energy demands without the expense and permanence of a grid-tied system. Popular within the garden office trend, these complete PV installation kits are ideal for others with parallel power aspirations.
Garden office: 800W - £2099.00
Monocrystalline solar panels.
1 x Roof fitting kit.
1 x Inverter.
1 x DC isolator.
1 x Generation meter.
15m/4mm cable.
Connectors.
Family size: 2400W - £4399.00
Monocrystalline solar panels.
1 x Roof fitting kit.
1 x Inverter.
1 x DC isolator.
1 x Generation meter.
15m/4mm cable.
Connectors.
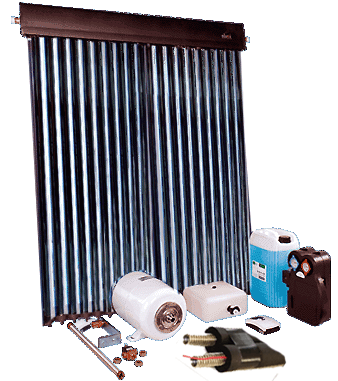
Evacuated solar tubes kits
Evacuated solar tubes provide hot water tanks and pools by tapping secondary coils or heat exchangers. This MCS-approved technology provide a better annual output than traditional flat-plate collectors in the UK.
150-250L Tank: 20 Evacuated tubes kit - £1599.00
20 Heat-pipes array.
1 x 25 Litre expansion vessel.
1 x Expansion vessel kit.
1 x Controller and pump station.
1 x 20 Litres Glycol fluid.
1 x Roof fixing kit.
15m of solar pipework and connectors.
(Twin-coiled tank sold separately.)
200-350L Tank: 30 Evacuated tubes kit - £1899.00
30 Heat-pipes array.
1 x 25 Litre expansion vessel.
1 x Expansion vessel kit.
1 x Controller and pump station.
1 x 20 Litres Glycol fluid.
1 x Roof fixing kit.
15m of solar pipework and connectors.
(Twin-coiled tank sold separately.)
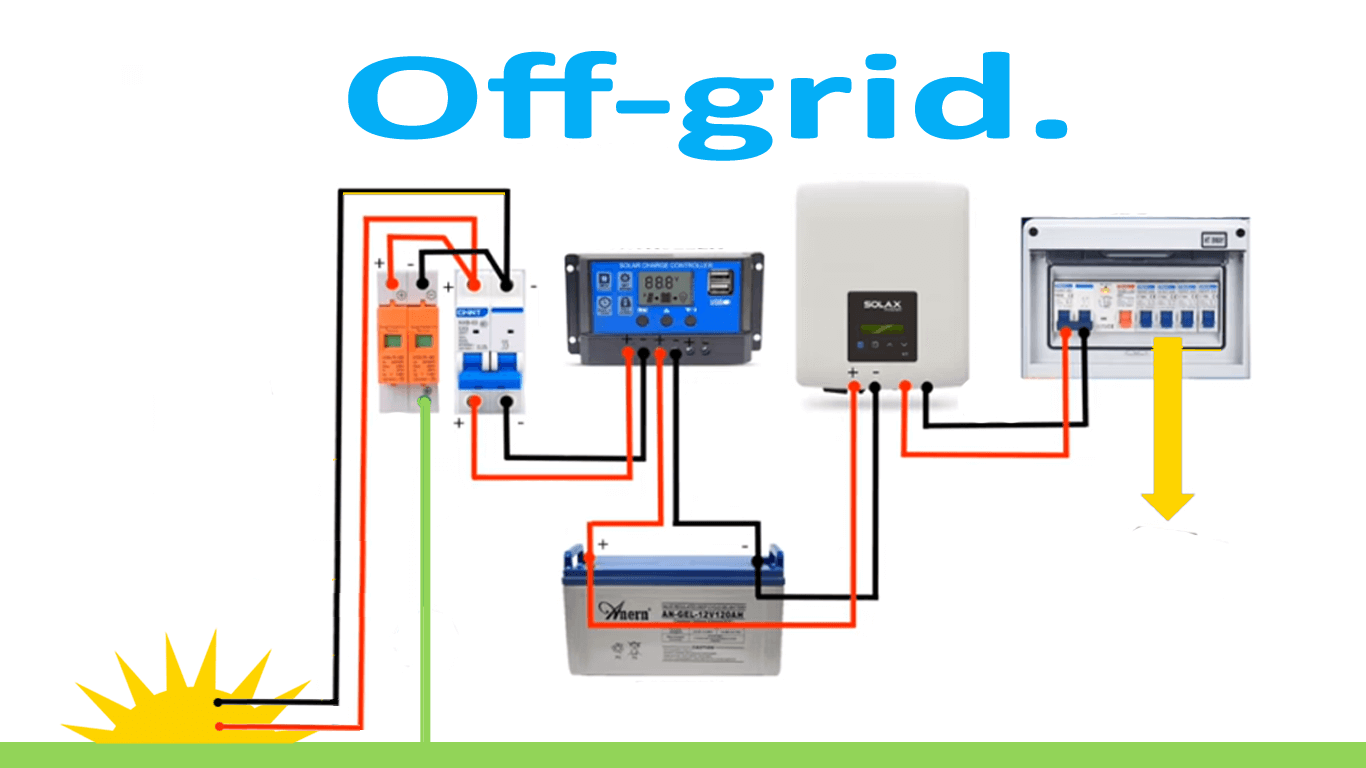
Installation of PV off-grid systems:
1. A safe working platform with ladders to help protect the roof surface and spread the weight of the installer. Locating the Inverter/Battery Pack next to your planned wire entry area is advisable to keep the wiring length as short as possible.
2. A winch and pulley system is available from tool hire shops. Clamp the aluminum 'horizontal rails' while checking they are square before committing to the final clamp down, with additional roofing-grade sealant around the fixing points. The best part of an installation is fixing each photovoltaic panel while connecting in series, routing, and securing the wiring with cable ties. A microfiber cloth is handy to wipe down as you go.
3. Run your wiring down to your Inverter's location and secure it to a wooden board with the electrical components and the battery's location. Enjoy your first cup of tea made with your PV-powered electricity. You've joined a growing army of people benefitting from photovoltaic solar panels.
Installation of a solar heating system:
For every 100-150 Litres cylinder size, you'll need one flat panel or two square metres of evacuated tubes.
1. Scaffolding will be necessary up to the level of the guttering. This equipment will give you a safe working platform. Use additional roof ladders to prevent damage to the roof covering. Make measurements from the inside of the loft space. Locate the pump station with the shortest route.
2. The roof anchors get fixed into the underneath roof batons. You can remove a tile or slate to gain access. Measuring diagonally from corner to corner will help square up the anchors ready for the aluminum mainframe. A winch and pulley system is available from tool hire shops.
The best part of this installation is attaching the solar panels to the roof. Some styles of evacuated tube collectors allow you to piece together the array.
Please note - Ready-assembled collectors will need to be hoisted up to the scaffolding using a roofers pulley system. Some self-installers work alongside a roofing company for this stage of the installation.
Professional installers always recommend compression joints. Solar heating technologies become pressurised to a three-bar flow. Because of this, compression joints are vital. An inlet and outlet hole for the pipes is drilled through the tile/slate and resealed using roof-grade silicone. Exposed pipework insulated with Armoflex insultation.
3. Route your pipework down towards the pump station with 'compression' joints. Connect the pump station to the hot and cold feed connections. Connect the pump station to the correct hot and cold feed connections.
The Expansion Vessel gets installed next to the pump station. Typical locations for these components are in the loft space, basement, or airing cupboard.
4. Some solar heating installations may require an upgraded hot water tank. Unvented or pressurised cylinders are typical, but a G3 plumber's accreditation is necessary - however, a traditional vented tank with a secondary solar coil is good.
5. Now decide where to locate The Controller.
Routing the Temperature Sensors from the controller to the tank and header can follow the route of the pipework in most cases.
6. Pressurising the system with the Glycol fluid can be done with a plumber's pump unit. Flushing the system out of all air bubbles is essential, and the pressure of three bars is standard. The final operation is to set up the controller and temperature sensors. Check pipework and connections.
A better way.
"I've witnessed many fantastic changes, innovations, and installation companies come and go. My fellowship with ethically-minded MCS solar panel installers goes back decades. Today, I offer my experience to ensure you gain real independence from this crazy geopolitical world."
Stuart Lovatt
Power My Home Solar Panels
Sundial House, 44 Panton Road, Chester CH2 3HX.
01244 722 607
Est. 2004.